


In this tip:
- Introduction
- Z)# Miner fly mesh cage
- A)# Small cabbage cage
- B)# Big cabbage cage
This tip contains 3 designs of a “mesh cage” to keep butterflies away from cabbage plants.
One remark in advance (watering pots):
In this tip there are watering pots around plants.

To make a watering pot, cut off the top part of a plastic flower pot. Put the watering pot around a plant and push it a little in the garden soil. When you pour water in the watering pot, the water will sink to the roots of the plant.
.
Introduction
During warm, sunny weather, female Cabbage White butterflies lay their eggs underneath the leaves of cabbage plants. The eggs turn into caterpillars that eat cabbage leaves, cauliflower or Green Broccoli.
During preparation in the kitchen, remove all caterpillars (otherwise you’ll have an unpleasant surprise on your plate).

Every day, inspect the bottom sides of leaves for eggs or caterpillars (and remove them).
It’s easier to grow the cabbage plants in a “butterfly proof” cabbage cage.
.
.
Z)# Miner fly mesh cage
You can put a wooden frame with fine mesh over the cabbage plants. This stops all “cabbage critters”; butterflies, cabbage flies, Swede midges.
In tip 4) , this construction is described at chapter B)# leek. The cage is over cabbage plants (and winter carrots) from March to August (early spring to mid summer). Then over winter leeks from September to December (autumn).
.
.
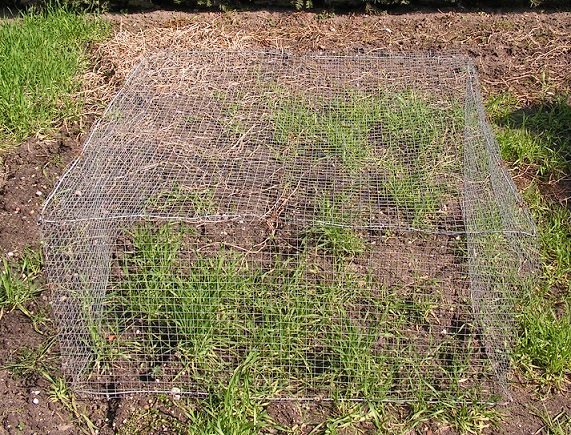
A)# Small cabbage cage
For the school garden in my residence, I made a small cabbage cage. Surface area is 100 x 130 centimeters (3 ft + 3,5 inch x 4 ft + 4 inch). Height is 70 centimeters (2 ft + 4 inch). This cage is on the garden soil and can be removed easily.
This cage, made of bamboo sticks and fine iron mesh, only protects against the Cabbage White butterfly.
Below a short description.
A1) Idea:
The idea of the small cabbage cage originates from this “coop” for our Guinea pig. Made from sturdy wire netting and thick iron wire.
You can make a small cabbage cage of about the same construction. See below.
.
A2) Needed:
In the description below, “millimeters” is abbreviated to “mm”, “centimeters” to “cm”.
.

Bamboo sticks, iron wire netting (mesh size 12.7 mm, 0.5 inch), tie wraps, thin iron wire.
Iron wire netting of 1 mm (o.04 inch) wire thickness is very stiff and rather expensive. I use netting of 0.65 mm (0.025 inch) wire thickness. For firmness I fasten bamboo sticks to the iron wire netting using tie-wraps or thin iron wire.

Thin wire iron netting (0.65 mm wire, 5 meters wide, 1 meter high) costs about €25.00.
.
A3) Construction

Tip: Use work gloves when handling the iron wire netting.


- Remove the wire around the roll. Unroll the netting wire.

- This netting is 2 inches longer than the info on the label (5 meters). At this end, the netting has been cut right next to the metal wire.

- At the other end, the netting has “long”, sharp iron wires.

- The wires have been welded and covered with zinc.

- Use a nail clipper to cut the iron wire.
- Cut “close to the next wire” to get very short wire ends at the netting. See red/white arrow.

- Have the netting on the edge of a wooden board.
- Use a file to remove sharp wire ends after cutting.

- Cut 5 pieces of 70 x 100 cm (27.5 x 39.5 inch) from the roll of wire netting.
- Use a file to smooth the cut ends of the netting.
- These 5 pieces of netting are on a stack (left on the photo above).
You end up with a piece of 150 x 100 cm (5 ft x 39.5 inch) (right on the photo above).
.
Fastening bamboo sticks to 2 pieces of netting of 70 x 100 cm (27.5 x 39.5 inch).
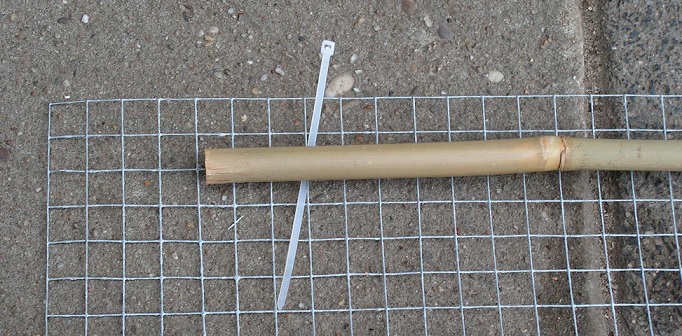

- Lay a piece of wire netting (70 x 100 cm) on a floor or pavement.
- Use 4 straight bamboo sticks that are about 4 inch (10 cm) shorter than the wire netting.
- Fix one bamboo stick between the 2nd and 3rd mesh (counted from the outside).
- Use tie-wraps or thin iron wire to fasten the bamboo stick.
- Put each tie-wrap or piece of thin iron wire slanting ( / or \ ) through 2 holes of the netting.
- Distance between 2 tie-wraps or pieces of iron wire is about 12 cm (5 inch).
- Fasten 4 bamboo sticks to the wire netting.
Make 2 pieces of netting (70 x 100 cm) with bamboo sticks.
.
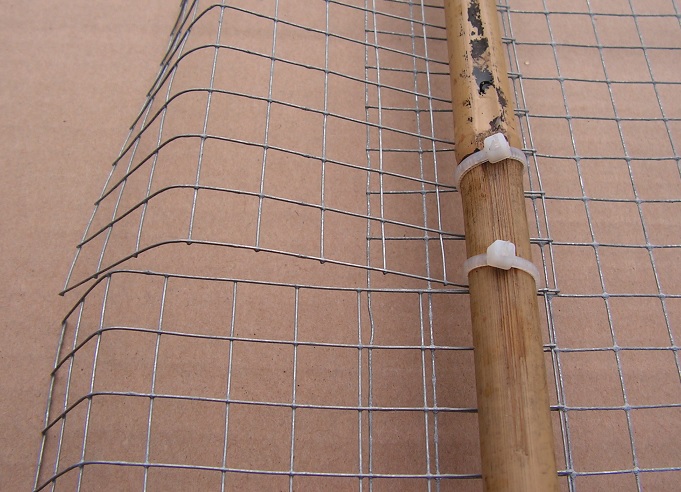
My experience: Tie wraps break after a few years. So you better use thin iron wire to fasten the bamboo sticks.
.
You can make the other 2 sides longer, about 70 x 130 cm. Act as follows;
- Use 1 piece of 70 x 100 cm (27.5 inch x 39.5 inch) (from the left stack).
- From this piece (70 x 100 cm), cut 2 narrow pieces, each 70 x 30 cm (27.5 x 12 inch).
- (the residual piece, 70 x 40 cm (27.5 x 16 inch) will be used for the lid, later).

- Lay one narrow piece (70 x 30 cm) next to one piece (70 x 100 cm).
- Connect the narrow piece of 70 x 30 cm to the 70 x 100 cm piece using tie-wraps (or even better, thin iron wire).
- You end up with 1 big piece of wire netting, size 70 x 130 cm.
- Use the same steps to make the 2nd piece of wire netting of 70 x 130 cm.
.
My experience: Tie wraps break sooner or easier than thin iron wire during usage. So you better use long thin iron wire and “string” it through many meshes to connect the pieces of netting.
- Fix 4 bamboo sticks to the piece of wire netting of 70 x 130 cm. Use the same steps as described above (at the other piece of wire netting).
- (on this photo the side piece of 70 x 100 cm).
Make 2 side pieces of netting (70 x 130 cm) with bamboo sticks.
.
Now you have 4 side pieces; 2 pieces of 70 x 100 cm and 2 pieces of 70 x 130 cm.
.


Use these type of plastic clips to fix the 4 sides of the cage together.
- Put each strip through meshes (holes) of the second row counted from the end. So less risk of breaking or loosening of mesh wires.
My experience: At my first design, I used tie-wraps to fix the 4 sides together. See photos below. These tie-wraps break after a few years.
Plastic strips, as shown on the photo above, are firmer than tie-wraps. You can fasten and loosen them. After loosening, you have 4 separate sides, easily to transport and store.
Further:
(On the next photos of my first design, there are tie-wraps visible)

- At each corner, use many tie-wraps to connect the sides.
- (or use plastic strips)
- Before storage, you can cut the tie wraps that connect the 4 sides.
- (or open and remove plastic strips)

- Or fold the cage like this. Dimension 70 x 230 cm. Quite big.
.
Making the lid
- Use left-over wire netting (150 x 100 centimeters), right on this photo.
- And use the residual piece, 70 x 40 cm (27.5 x 16 inch) left over from making 2 sides of 70 x 130 cm.
- And use bamboo sticks and tie-wraps or thin iron wire.

See photo above:
- Make the lid from the wire netting, bamboo sticks and tie-wraps (or thin iron wire)
- The lid has 4 sticks near the ends and 2 sticks “more towards the middle”.
- These “middle sticks” prevent the lid from collapsing. And easy when lifting the lid from the cage.
- When using all metal wire netting pieces, you can make the lid 5 cm (2 inch) bigger (longer and wider) than the cage.
- The lid fits wide over the cage.
- The lid has 4 bent edges and 4 bent corners.

- At 2 sides, the edges of the lid have been bent (folded over).

At the 2 other sides, the lid has been made wider with pieces of wire netting. Fasten these pieces using tie-wraps or thin iron wire.
.
Strengthening the outer edge of the lid:
During usage, the outer side of the lid can get “ragged”; iron wire of the netting comes loose at the weld. I will “repair” this outer side using nylon cord or thin iron wire.
.
You can fix the lid to the cage as follows:
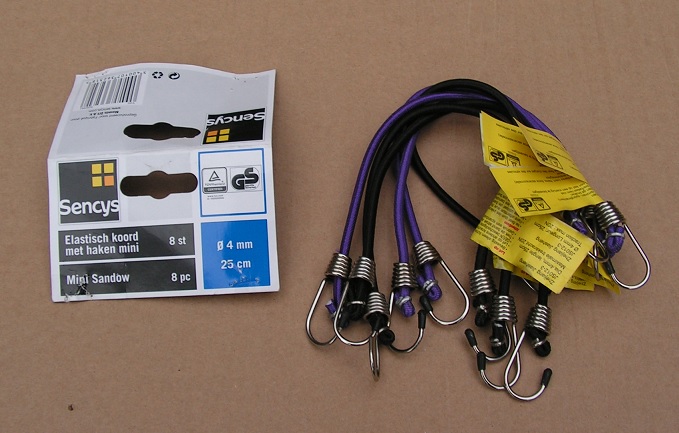

To prevent butterflies from entering via openings underneath the lid, you can fix the lid to the side using elastic cord with hooks. Do this at all 4 corners of the cage.
.
.
B)# Big cabbage cage
This big cabbage cage was used in my allotment garden for more than 10 years. Many cabbage plants fit in it. The cage protects against Cabbage White butterflies only.

Dimensions: length 260 cm (8.5 ft), width 170 cm (5.5 ft), height 60 cm (2 ft).
In the cage, there is room for 15 cabbage plants. You can put cabbage plants that are not “butterfly sensitive” (not eaten by caterpillars) outside the cage. For example white cabbage, green cabbage, red cabbage, savoy (crinkly) cabbage.
.
The cage must be built up each year; tubes in the soil, iron wire netting around, wooden frame on, nylon net in wooden lid frame, lid frame on. So much work.
Below a description.
B1) Parts needed

The cabbage cage consists of these parts:
- Square mesh metal wire netting at the sides. Height 63 cm (2 ft 1 inch), mesh 12.7 mm (0.5 inch).
- In each corner a metal tube vertical in the soil. The 4 tubes support the side netting and a wooden frame.
- On top a rectangular wooden frame. Four iron pens are in the 4 vertical tubes.
- Nylon cord to fasten the wooden frame to the top of the side netting.
- A lid that consists of a wooden frame with fine mesh net on it. This lid can be set open at both long sides of the cage. A vertical supporting lath keeps the lid open. The lid can also be removed from the cage.
.
B2) Parts
Here is a description of the 5 parts. There is information about making, remodeling or adaptation of the parts.
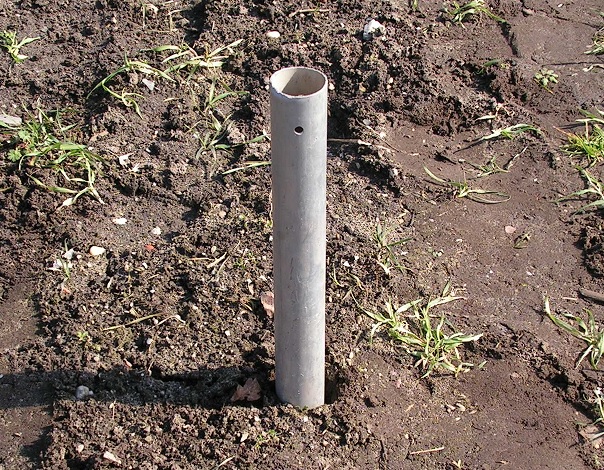
1. Tubes

These tubes are made of aluminium. They have been used at roll-up blinds. The tubes are about 4 cm (1.5 inch) wide and 120 cm (4 feet) long.
Maybe you can buy this type of tubing at a D.I.Y. shop. P.V.C. tubing can also be used, I think.
.
2. Metal wire netting

The wire netting looks like the netting of the small cage (wire thickness 0.65 mm, mesh opening 12.7 millimeters (0.5 inch). Height is about 60 centimeters (2 ft). The ends have been tied together with iron wire.
.
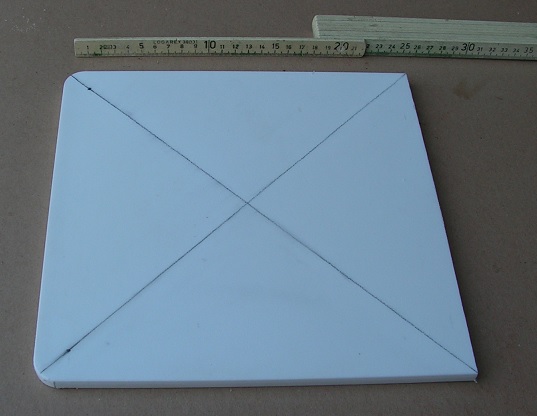
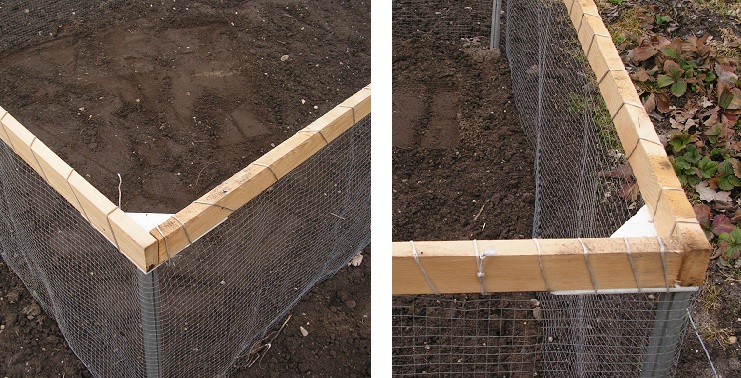
3. Rectangular wooden frame

The rectangular frame. Made of unplaned (rough sawn) wooden laths of about 2 inch wide and 1 inch thick (50 x 22 mm).

At each corner fasten a plastic connecting plate. Put in 1 long wood screw plus piece of garden hose.
.

Use a hack saw to saw the connecting plates from a plastic cutting board of about 8 mm (5/16 inch) thick.

Drill 4 holes in each connecting plate (used to put a thin nylon cord through.
At each corner, shorten 1 lath of the wooden frame. To make a space between the laths, so rain water can flow away.

Instead of plastic connecting plates you can use metal corner braces. But these braces will rust. And a frame with metal corner braces is less form-retaining.

For each pen you use a long wood screw, a metal nut ring and a piece of garden hose.
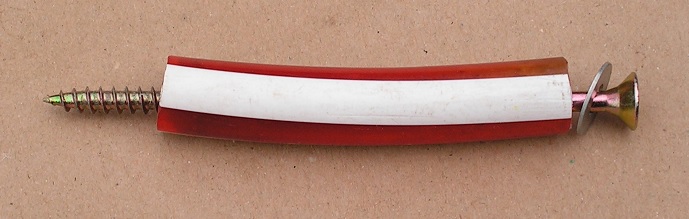


The wood screw with ring and piece of hose is put through a hole in the connection plate and fixed in the wooden lath.
.
Folding the frame
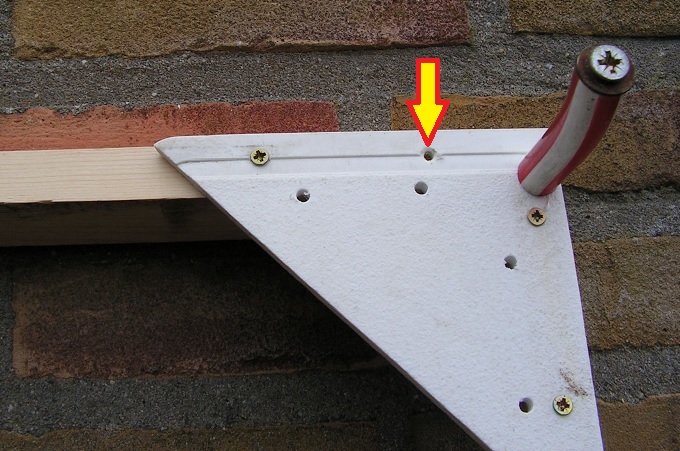
At each corner, remove one wood screw (indicated by the red/yellow arrow).

Fold the frame. Easy for storage or transport. In the garden, open the frame and put in the 4 screws again.
.
4. Cord

Four pieces of nylon or plastic cord to fix the metal wire netting to the frame.
.
5. Lid
The lid frame has been made of unplaned (rough sawn) wooden laths of about 30 mm wide and 22 mm thick (1 1/4 x 1 inch).

Plastic connection plates are used to join laths together.
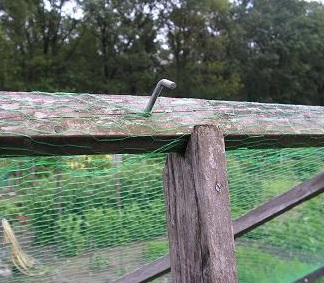
At the inner side of each lath, there are iron nails to fasten the net later. Distance between nails is about 8 cm (3 inch).

The nails are a little sloping (down on this photo) so the net will not slip away so easy.
This sloping: the nail head is nearer to the plate than where the nail enters the wood. All iron nails are sloping in the same direction.

When you remove the right screw in each plastic connecting plate, you can fold the lid frame. So easy transportable.
.
6. Fine mesh net on the lid
The next net (PLENA) has small mesh and keeps the butterflies outside.

This net has small mesh size. The butterflies will not pass.

The sticker of the net.
.
B3) Assembling (putting down) the cage
Below is described how to build the cabbage cage.

- Lay the frame on the soil, with the long pens (wood screw with hose) upward.
- Loosen the screws slightly.
Make the frame “right”, so straight corners.

- Put a piece of rope from one corner…..

- ….to the opposite corner.
- Determine the distance between the 2 opposite corners.
- Use this method to measure the distance between the other 2 opposite corners.
- When these distances are not equal, the frame is not “right”. Change the shape of the frame until both distances are equal.
- Fasten all screws of the frame.


- Carefully turn the frame and lay the frame on the garden soil, at the place where the cage must be built.

- Push each long pen in the garden soil to make a small hole. Then remove the frame.
- At each small hole, a tube must be put in the soil.

- Use a short and wider tube and a hammer to make the 4 holes in the soil.
- (use a wooden hammer or put a wooden board on the tube and use a metal hammer)
- Repeat hitting the tube in the soil, taking out and knocking the earth out of the tube.
- Lay the frame on the garden soil and check if all 4 pens fit into 4 holes in the garden soil. Then remove the frame again.

- Put one metal tube in each hole.
- Hit each tube into the soil until it is about 2 feet above the soil.
- Use a wooden hammer. Or hit with a metal hammer while putting a wooden block on top of the tube. This is to prevent damaging the tube.


- Put the frame on the vertical metal tubes;
- put 2 plastic connection plates of 1 lath on 2 tubes.
- and put the other 2 connection plates on the 2 other tubes.
- At each corner, put the thick pen (wood screw with piece of hose) in the tube. When needed, bend the tube aside to put the pen in.
Keep the frame on the 4 tubes until you start digging the soil.
Right before digging, take the frame from the 4 tubes. The 4 tubes remain in the garden soil.

- Dig or till the soil around and between the tubes.
- Lay stepping boards on the garden soil, so earth will not be tread down.
- Make a small furrow between the 4 tubes. A small lower part of the metal wire netting can be dug in.

- Put the metal wire netting around 3 tubes.
- On the photo the netting is around all tubes except the left rear tube.

- Dangle the rear left tube in the garden soil to make a big round hole in the earth.
- Then take this tube out of the soil.

- Put this tube at the “inner side” of the wire netting.
- Push the tube against the wire netting until the tube is above the hole in the soil.
- Put this tube in the hole in the garden soil.
The metal wire netting is now around all 4 tubes.
- Push the lower part of the wire netting into the small furrow.

- Put the frame on the 4 tubes again (with plates on top of the tubes).

- At each corner, put the pen into the tube.

- When the frame is higher than the side wire netting;
- Carefully hit the corner of the frame until the tube is at the right depth.
- Then put earth into the furrow to fix the lower part of the metal wire netting.

- Wrap nylon or plastic cord through the upper meshes and around the laths. To have the wire netting well connecting to the laths.
.
Digging soil after putting down the cage:
You can also work the garden soil after putting down the cage.
.
Putting the lid on

- Put the lid frame (without net) on the frame. First put it “skew” on the frame.
- Turn the lid carefully.
- Until the corners of the lid are on the plastic connection plates of the frame.
- In each long lath of the lid, put in 2 L-shaped wood screws.

- Fix 2 laths slanting on the lid frame.
- When the lid frame is stuck (jammed) near the middle of its long lath, you can screw the slanting laths “somewhat further” to make more space between lid frame and cage frame.
.
Fixing the net

- Put the lid frame on 3 big flower pots at an empty area in the garden.
- Put the net on the frame and fix it to the iron nails in the laths as shown on the photos below;


- Each time cut off a piece of the net to have it fitting the frame.
- Fix the net to the nails in the lid frame.
- Check if the net is behind all nails.

- Put the lid (with net) on the cabbage cage.
- You can put the “open slat” on the lid.
On this photo the cage has been opened at 1 side. The open slat keeps the lid in an open position.
This photo shows the v-shaped end of the open slat.

This is an amazing description. thank you very much. Quite a fantastic design and thoughtfulness to post this so carefully. Much appreciated.
Hello John,
Thanks for the complement.
Indeed with this “cage” no caterpillars in or on the cabbages.
It takes some time to build the cage, but once built, you can use it each season.
Sjef
Awesome, exactly what I was looking for to make a bunny run.
But can see also great for growing veges 😀
Exactly what I want to protect my cabbages! Thanks
Hi Lori,
My design cabbage cage is working well and rather easy to build.
Good luck with building your cabbage cage.
Greetings,
Sjef