
In this tip:
- Introduction
- A)# Narrow tunnel made of wire netting, garden hose and bamboo stick
- B)# Broad tunnel made of wire netting, garden hose and bamboo stick
.
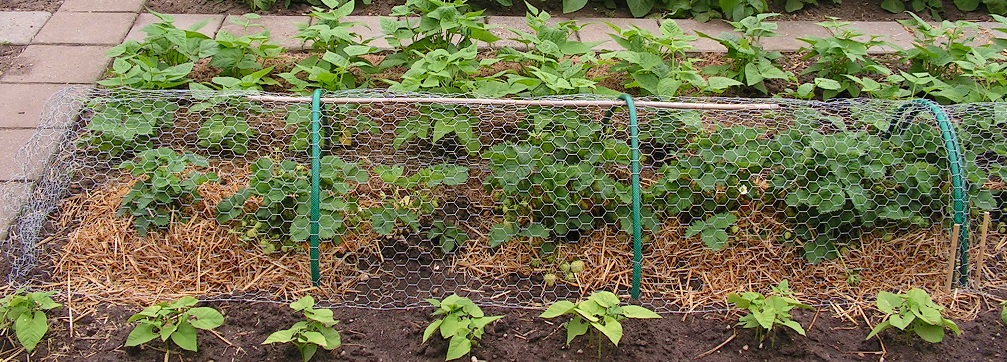
A tunnel of wire netting over strawberry plants. Birds can’t reach the plants, but you can (to pick the fruits).
.

One narrow tunnel over 1 row of strawberry plants. This tunnel (length 4.20 meters, 14 ft) consists of 2 parts in a row.
or….
One broad tunnel over 2 rows of strawberry plants. This tunnel (length 4.20 meters, 14 ft) consists of 2 parts in a row.
.
Introduction
Many people like strawberries from their own garden.

Many birds too. Especially when you have a strawberry variety that gives sweet fruits.
You can put a birds net over the strawberries to keep the birds away. Before picking, the net must be removed. Or during picking one goes on all fours under the net.
A birds net is “birds friendly” when the net is tight and reaches to the ground. But…….. when a piece of net is not reaching the ground or when there are openings, birds can get ensnared in the nets. Nobody wants that.
.
You better put a “mesh tunnel” made of iron wire netting, garden hose and bamboo sticks over strawberry plants. Easy to make. And very useful.
You can put 1 narrow tunnel over 1 row of strawberry plants. See chapter A)#.
Or you can put 1 broad tunnel over 2 rows of strawberry plants (row spacing 30 to 40 centimeters, 1 ft to 1 ft 4 inch). See chapter B)#.
.
A)# Narrow tunnel made of wire netting, garden hose and bamboo stick
- Tunnel part with 2 open ends (at left and at right).
- Tunnel part with 1 folded end (at left) and 1 open end (at right).
A tunnel (part) is maximal 2.5 meters (8 ft) long. A longer tunnel is harder to put down on the soil or will wiggle. At a longer row, put more tunnel parts in a row. At each end, the tunnel is closed; with a (perspex or corrugated) plate or the metal netting has been folded to close.
Pieces of garden hose and (bamboo) sticks keep the tunnel parts in a (round) shape.

You can put small (bamboo) sticks in the soil to keep the tunnel parts together and in shape.
Use: Right before picking, lift a tunnel part at one long side. Hold that side up during picking; put an object under it or rest that side on your leg. After picking, let that side lower to the garden soil again.
.
A1) Materials needed:

- Iron wire netting, 1 meter (1 yd, 4 inch) high, mesh size 25 millimeters (1 inch). Price about € 2,50 per linear meter. For a tunnel part you need about 3 linear meters.
- (old) Plastic garden hose, normal size.
- Piece of 5/8 inch PVC conduit pipe (when you want to fold the end of the netting).
- Bamboo stick (length about 1.2 meter, 4 ft).
.
A2) Making
Near 1 or 2 ends of the tunnel there is a piece of garden hose in the netting. You can fasten this hose to the tunnel as follows;
1) roll the hose in the wire netting or
2) pass the hose through the meshes of the wire netting or
3) make a “tube of wire netting” and pass the hose through that tube.
Method 1 is easiest, procedure 2 is more work and method 3 is a lot of work.

Use work gloves at each method.
Below descriptions of these 3 procedures.
.
1) Roll the hose in the wire netting (little work)
You can cut straight one end of wire netting. Then “roll a piece of garden hose in the wire netting”. See below.

- Put a thin bamboo stick in the piece of hose.
- This makes the hose straight. That’s useful when rolling the hose in the netting.
- (without bamboo stick, the hose is curved as it was when coiled.

- Lay the iron netting on the ground.
- Use sharp pliers to cut one end of the wire netting straight.
- Cut the twisted iron wires by half the length, see arrows on the photo above.
- The iron netting remains intact; short twisted iron wires can get loose.

- Put the straight hose through the outer meshes of the first row.
- The garden hose is on the first row of meshes and stays there during rolling up.

- Roll the end of the iron netting as tight as possible around the garden hose.
- When needed, roll with 2 persons next to each other.

- Here, the iron netting has been rolled around the hose 2.5 times.
- The short iron wires are “in the gap between the hose and the rest of the netting” (red yellow arrow).
- So there is little risk of injury by these short wires.

- Pull the bamboo stick out of the hose. The hose get curved a little again.
- When needed, turn the hose in the wire netting to get the right curvature.
- Cut the wire netting to the right length.
- When needed, use the same procedure to roll a piece of hose in the wire netting at the other end.
- Cut the garden hose(s) to the right length.
.
2) Pass the hose through the meshes of the wire netting (more work)
You can cut straight one end of wire netting. Then pass a piece of garden hose through the meshes. See below.
- Lay the iron netting on the ground.
- Use sharp pliers to cut one end of the wire netting straight.
- Cut the twisted iron wires by half the length, see arrows on the photo above.
- The iron netting remains intact; short twisted iron wires can get loose.


- Bend the short twisted iron wires in a n-shape (use pliers with curved jaws);
- Photo above: 3 short iron wires at right have been bent in a n-shape.
- Photo above: 2 short wires at left need to be bent.
- After bending in a n-shape, the end of the wire netting is less sharp.

- Put the piece of hose through the last row of meshes.
- Each time after 2 meshes, put the hose through a mesh to the other side of the netting. See photo above.
- Cut the wire netting to the right length.
- When needed, use the same procedure to put a piece of hose in the wire netting at the other end.
- Cut the garden hoses to the right length.
.
3) Make a “tube of wire netting” and pass the hose through that tube (most work)
You can cut straight one end of wire netting. Then make a tube of wire netting to pass a piece of garden hose through. See below.
- Lay the iron netting on the ground.
- Use sharp pliers to cut one end of the wire netting straight.
- Cut the twisted iron wires by half the length, see arrows on the photo above.
- The iron netting remains intact; short twisted iron wires can get loose.


- Bend the end of the netting around the conduit tube (use pliers).
- Twist all loose iron wire ends around iron wires, a few meshes further. Use small pliers with curved jaws. See photos above.

- Put a piece of garden hose in the tube of wire netting; push the hose in and meanwhile pull the conduit tube out.
- Cut the hose to the right length;
- length 10 cm (4 inch) shorter than the width of the wire netting (for a Ω-shaped tunnel, see photo above).
- or length a little more than the width of the wire netting (for a “normal” tunnel).
- Cut the wire netting to the right length.
- When needed, use the same procedure to put a piece of hose in the wire netting at the other end.
- (Cut the garden hoses to the right length).
.
A2a) Rounding and fixing more pieces of garden hose

- Bend the netting in a round form.
- Bend the lower ends back to form a “foot” at each end of the netting. The tunnel shape becomes the letter Ω. This makes the tunnel more rigid.


- Put extra pieces of hose through the holes (meshes) of the wire netting.
- Put each piece of hose through about 8 meshes so the hose is alternately over or under the wire netting.
- Distance between 2 hoses is about 60 centimeters (2 ft).
.
A2b) Tunnel with 2 open ends

A tunnel end with 2 open ends has a piece of garden hose at each end. So two hoses fastened to the tunnel.
.
A2c) Folding (closing) one open end
At a tunnel part, you can fold the iron wire netting to close. As follows:

- Bend over twisted iron wires to prevent injuries. Use small pliers with curved jaws to do this.

- This paper model shows how to bend and fold the netting.
Below some photos of the wire netting that is folded in that way.


A tunnel part with a folded end to close at the right side.
.
A2d) Bamboo stick

- Put a bamboo stick through a few top meshes of the tunnel part.
- The stick makes the tunnel part more firm.
- You can grasp the bamboo stick to lift and move the tunnel part.
.
A3) Putting down the tunnel on the soil
- Put each tunnel part over the row of strawberries.
- Put the tunnel parts in a row.
- Bend each tunnel part round to have it fit well over the plants.
- At each open end of the tunnel, put a (plastic) plate in the soil right against the end of the tunnel.
.
A4) Plastic foil on tunnels
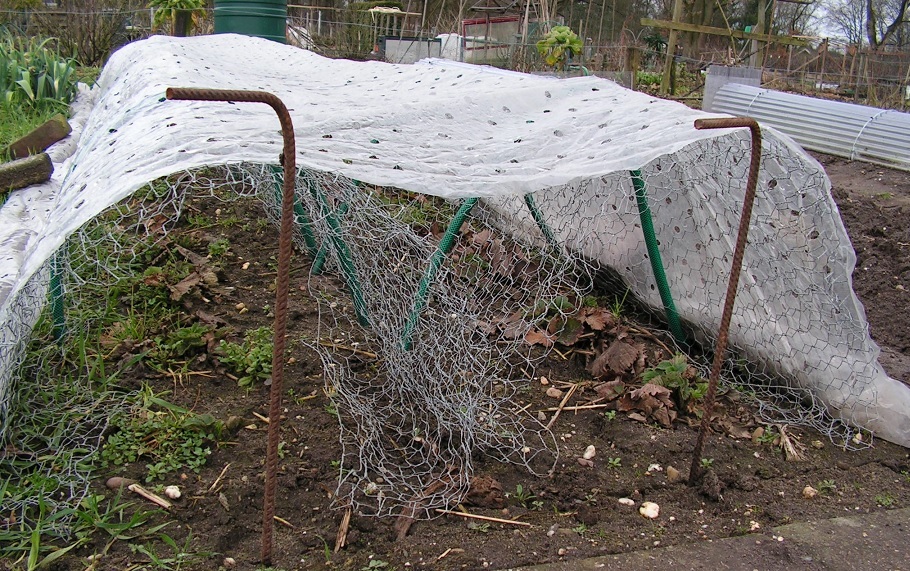

During late winter and early spring (February to April) you can put perforated plastic foil on the tunnels. Lay bricks on the sides against blowing loose. Under the foil, the temperature is higher and the strawberry plants grow faster.

At heavy frosts, you can lay closed plastic foil on top to protect the flowers of the strawberry plants against freezing. And bricks or beams against blowing away.
.
A5) Rolling up and storage
When all fruits have been picked, each tunnel part can be rolled up. So you need little room for storage.

- Remove the bamboo stick.
- Put each piece of netting upside down.
- Flatten the netting and roll up.
- The pieces of garden hose remain in the netting during rolling up.

- Put a piece of rope around the roll of wire netting. You can store it under a roof.
- Next year: unroll the wire netting, bend it in a round form and put in a bamboo stick.
.
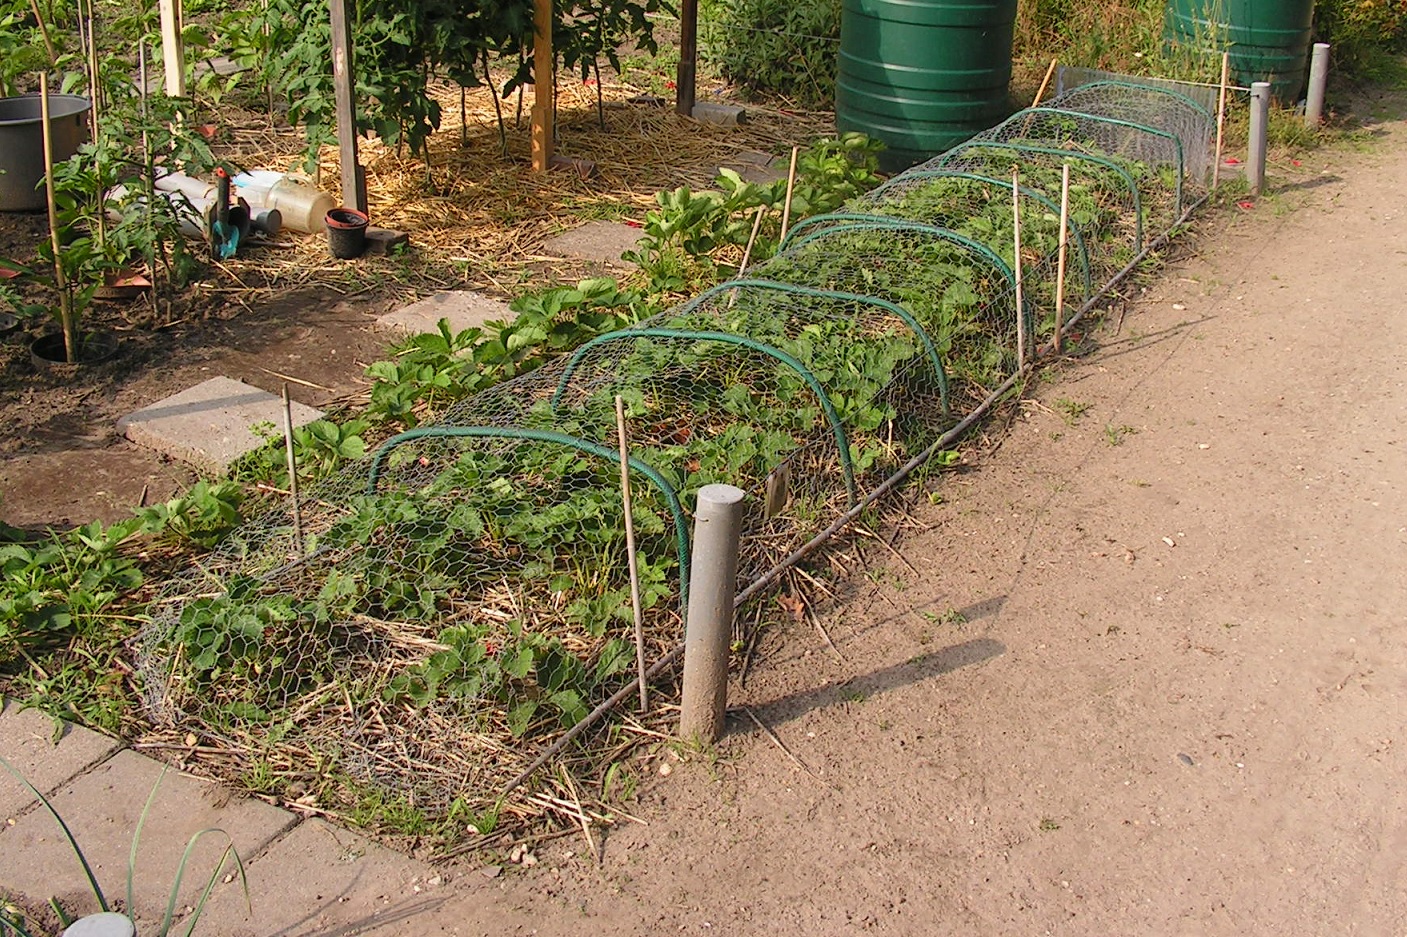
B)# Broad tunnel made of wire netting, garden hose and bamboo stick
When you have a distance of 30 to 40 centimeters (1 ft to 1 ft 4 inch) between 2 rows of strawberry plants, you can put 1 broad tunnel over these 2 rows. Picking strawberries is no problem. Lead strawberry runners to the (empty) space next to the rows of strawberry plants.

Two photos of a broad tunnel over 2 rows of strawberry plants.
.
B1) Properties of this tunnel:
Use the same materials;
- Iron wire netting, 1 meter (1 yd, 4 inch) high, mesh size 25 millimeters (1 inch). Price about € 2,50 per linear meter. For a tunnel part you need about 3 linear meters.
- Plastic garden hose.
- Piece of 5/8 inch PVC conduit pipe (when you want to fold the end of the netting).
- Long bamboo sticks, length 2 to 2.5 meters (7 to 8 ft).
.
B2) Making:

- Use pieces of plastic garden hose, length about 1 meter (1 yd, 4 inch).
- Put the pieces of garden hose in the wire netting as described at A2).
- You can make a tunnel part with 1 or with 2 open ends, see at A2). My preference: 2 open ends, easier use and storage.

- Below at each long end put one thin bamboo stick in the wire netting.
- The bamboo stick has the same length as the tunnel part.
- Put the stick (each 4 to 5 meshes) to outside or inside.
- When needed, use a hack saw to shorten the bamboo stick after putting in.
.
Much easier, use 2 short bamboo sticks:

- Use 2 short bamboo sticks (length 120 cm or 150 cm, 4 or 5 ft) at each long end. Putting in and taking out is much easier.


- At each tunnel end put a short bamboo stick in the wire netting.
- Put the thinnest end of the stick in the wire netting first.
- Put the stick to outside or inside (every 4 or 5 meshes).
- Put each short stick “completely” (until its end) in the wire netting.
- At the middle of the tunnel, put the thinner ends of the bamboo sticks “through the same meshes”. The thin ends of the bamboo sticks overlap there.
.
B3) Use:
- Put each tunnel part over 2 rows of strawberry plants.
- When needed pull or push at the long side of the tunnel to have the tunnel fitting well over 2 rows of plants.
- Put 2 (short) bamboo sticks in the garden soil at the outer side against one long side of the tunnel part.
- At each end of the tunnel, put a (perspex or corrugated) plate in the soil (of fold the metal netting to close).
- Picking;
- Lift the tunnel part at one long side.
- Hold that side up during picking.
- Put an object under that side or rest it on your leg during picking.
- After picking, let that side lower to the garden soil again against the short bamboo sticks in the garden soil
- During lifting the tunnel part, lay the stolons and runners “outside the tunnel” on the soil. So no runners will get trapped in the mesh. Stolons are connections between mother plant and child plants.
- At a closed tunnel, its long side rests on stolons. That’s no problem.
- When picking fruits at the other row, lift the other long side of the tunnel.
.
B4) Plastic foil on the tunnels
You can put plastic foil on the tunnel as described at A4).
.
B5) Rolling up and storage

A broad tunnel can be rolled up like this. You can roll up 2 tunnel parts in 1 roll. Easy to transport, easy to store.
But you can also remove the bamboo sticks and roll up the iron wire netting “in the other way”, similar to the narrow tunnel part, see A5).
.
Straw on the soil:

You can put straw on the garden soil (between and around strawberry plants). Do that long before there are flowers on the plants. Straw prevents the soil from cooling down strongly and from drying out fast, so less watering needed.
.
Garden hose (not) needed):
In my designs, pieces of garden hose keep the tunnel in a round form. What will happen to the tunnel without garden hose? Here’s the answer;


See photos above. At left there’s a tunnel without pieces of garden hose, at right a tunnel with pieces of garden hose. At left there are bamboo sticks in the soil to keep the tunnel in shape.
Put a small empty bucket on a tunnel; the left side tunnel “collapses”, the right tunnel sinks only a bit.

On this photo, the pieces of garden hose have been put in the left side tunnel again. Put a small empty bucket on the tunnel, the tunnel sinks only a bit.
So the pieces of garden hose are really needed against the collapse of the tunnel.
.
B6) Design made by Ian
Ian made a comment on this post. See below. He has made a construction more or less similar to my design.
Ian has sent me photos and descriptions about his construction. See below.


- I used a supermarket basket as a form to shape the mesh (any suitably shaped item would do ). The upturned basket was not quite tall enough so I stood it on a few bricks to add some height.
- The mesh came in a 10m roll, 90cm wide. I placed the end of the unrolled, unshaped mesh over the basket, bent it down to shape and then slowly fed the roll of mesh along, shaping it as I went, until it was shaped along its length (this is easiest with two people as the mesh is quite springy)
- I did not build feet into the construction – the mesh is a little rigid for this but I believe it would be possible if required
- I made the tunnel in approx. 2.5m long sections – just to make it more manageable – and simply placed the tunnel over the strawberries once made. I fitted the sections together by placing one so it slightly overlapped the previous to leave no gaps
- I used some old BBQ gratings over each end to close them off but any suitably sized sheet of metal or plastic would do
- To peg the tunnel in place I used some galvanised steel pegs – the type normally sold to hold weed blocking ground cover fabric in place
- To hold the tunnel sides in place snugly against the end, and also to hold the two parts of the tunnel where they joined, I inserted a couple of the steel pegs through the mesh and into the ground (you can just see one in the picture of the join between the two sections)

These are fabulous instructions. I set out to build design 1 but ended up buying a more rigid roll of mesh with rectangular holes. I bent this into an upturned U and just laid this over the row of strawberries with an old BBQ grating at either end to block the ends. This has worked really well for me. I would post a picture if I could.
Ian
Hi Ian,
Thanks for the comment.
I am glad that my design (nr 1) inspired you to make your construction.
Your photos and tekst have been added in chapter A7).
Greetings,
Sjef
I love how you’ve used the old hoses and I’ve got plenty.
Thanks for sharing, Cathy
So what do you do to get at the fruit? Move the entire thing?
Hi Terri,
You can pick up the entire narrow tunnel and put it somewhere else in the garden. But much easier is lifting one long side of the tunnel while picking the fruit (as described in A)# Narrow ….. at Use (picking fruits).
The broad tunnel is hard to pick up, so lifting one long side is the best solution, see chapter B3) Use.
Greets, Sjef
For my (Ian’s) design, at first I just lifted up one side to reach the strawberries but it was a bit awkward. More recently, I have stopped pegging it down and I just lift the whole thing off to pick the fruit and then put it back again. The wire cage is still going strong. I have just put it away at the back of the garden until next year’s strawberry season!